• Home
  • About
    • Fall Cleanse – 2025
    • Private Chef Services
    • Ayurveda
    • Mentoring
    • Food Relationship Coaching
    • Personalized Ayurveda Cleanses
    • Retreat + Event Catering
    • Postpartum Meal Prep + Delivery
    • Pregnancy Loss Doula Support
  • Book
    • Calendar
    • Cooking Classes
    • Pranaful Retreats
    • Farmers Market Tours
  • Press
  • Recipes
  • Blog
Menu

Pranaful

Street Address
City, State, Zip
Phone Number

Your Custom Text Here

Pranaful

  • Home
  • About
  • Services
    • Fall Cleanse – 2025
    • Private Chef Services
    • Ayurveda
    • Mentoring
    • Food Relationship Coaching
    • Personalized Ayurveda Cleanses
    • Retreat + Event Catering
    • Postpartum Meal Prep + Delivery
    • Pregnancy Loss Doula Support
  • Book
  • Calendar
    • Calendar
    • Cooking Classes
    • Pranaful Retreats
    • Farmers Market Tours
  • Press
  • Recipes
  • Blog

Baked Multi-Root Latkes

December 5, 2018 Meredith Klein
root_latkes.JPG

I was lucky to grow up in Texas (one of the only times you may ever hear me say that!) because it meant Decembers were mild enough that we could cook our latkes outdoors. My mom had an electric griddle that she would schlep to the back patio, where she would assemble a makeshift latke-frying station, and save our family from smelling like frying grease for the next week. Today, I am still keen to avoid the smell, but I get around this by baking my latkes in the oven. Yes, they’ll never be quite as crisp as their deep-fried brethren, but to have a house that is free of oil odors is priceless to me.

From an Ayurvedic perspective, baked latkes are easier to digest since they’re less oil-laden, and I add in a touch of cinnamon to aid digestion as well. I call for Ceylon cinnamon, as it’s gentle, sweet taste best complements the earthy root veggies, but you can certainly use regular spicy cinnamon as well, or omit it altogether. You’re also welcome to stick to 100% potato latkes, but I find using a mix of roots veggies always yields a more flavorful (and beautiful) experience. I also like to use red onion for its color, but white does the trick too! Choose organic root vegetables as we’ll be keeping the skins on. If you choose to use conventional produce, I would recommend peeling all vegetables before using (for this recipe and anything else).


Prep time: 10m | Cook time: 25m | Makes about 18 latkes

Ingredients:

1½ Tablespoons ground flax seed
2 pounds assorted root vegetables (I use sweet potato, parsnip and potato)
1 medium red onion
3 Tablespoons chickpea flour (besan)
1 teaspoon baking powder
1 teaspoon Ceylon cinnamon (optional)
1 teaspoon salt
Melted ghee or neutral cooking oil (about 1/4 cup)
Applesauce and/or sour cream or cashew sour cream for serving


Preparation:

Mix ground flax seed with 4 Tablespoons of water in a small bowl. Put in the refrigerator to chill.

Pre-heat oven to 425 degrees. Line 2 large baking sheets with parchment paper or reusable silicone mats, and brush well with melted ghee or oil. Be generous as the oil is going to help crisp your latkes when it comes time to bake them.

Wash all your root vegetables very well and dry completely with a towel. Shred your roots in a food processor or grate by hand (there is an eternal debate about which method is better…I am a food processor girl myself). Line a third large baking tray with a clean kitchen towel or a couple layers of paper towel and spread the shredded roots into an even layer. Top with another towel or a couple additional layers of paper towels. Top with a final baking tray, and place some heavy pans on top to help squeeze out the liquid (if you’ve run out of trays, you can also carefully put the weighted items directly on top).

Shred or grate the onion and then transfer to a mesh sieve. Use a silicone spatula or back of a large spoon to expel any excess liquid, and then transfer to a large bowl. After the roots have sat for about 10 minutes, add them to the bowl with the onion and stir well with your hands.

Mix together chickpea flour, baking powder, cinnamon and salt in a small bowl, and then sprinkle it over the vegetable mixture. Use your hands to integrate the flour mixture into the vegetables. Add the soaked ground flax seed, and mix well once more.

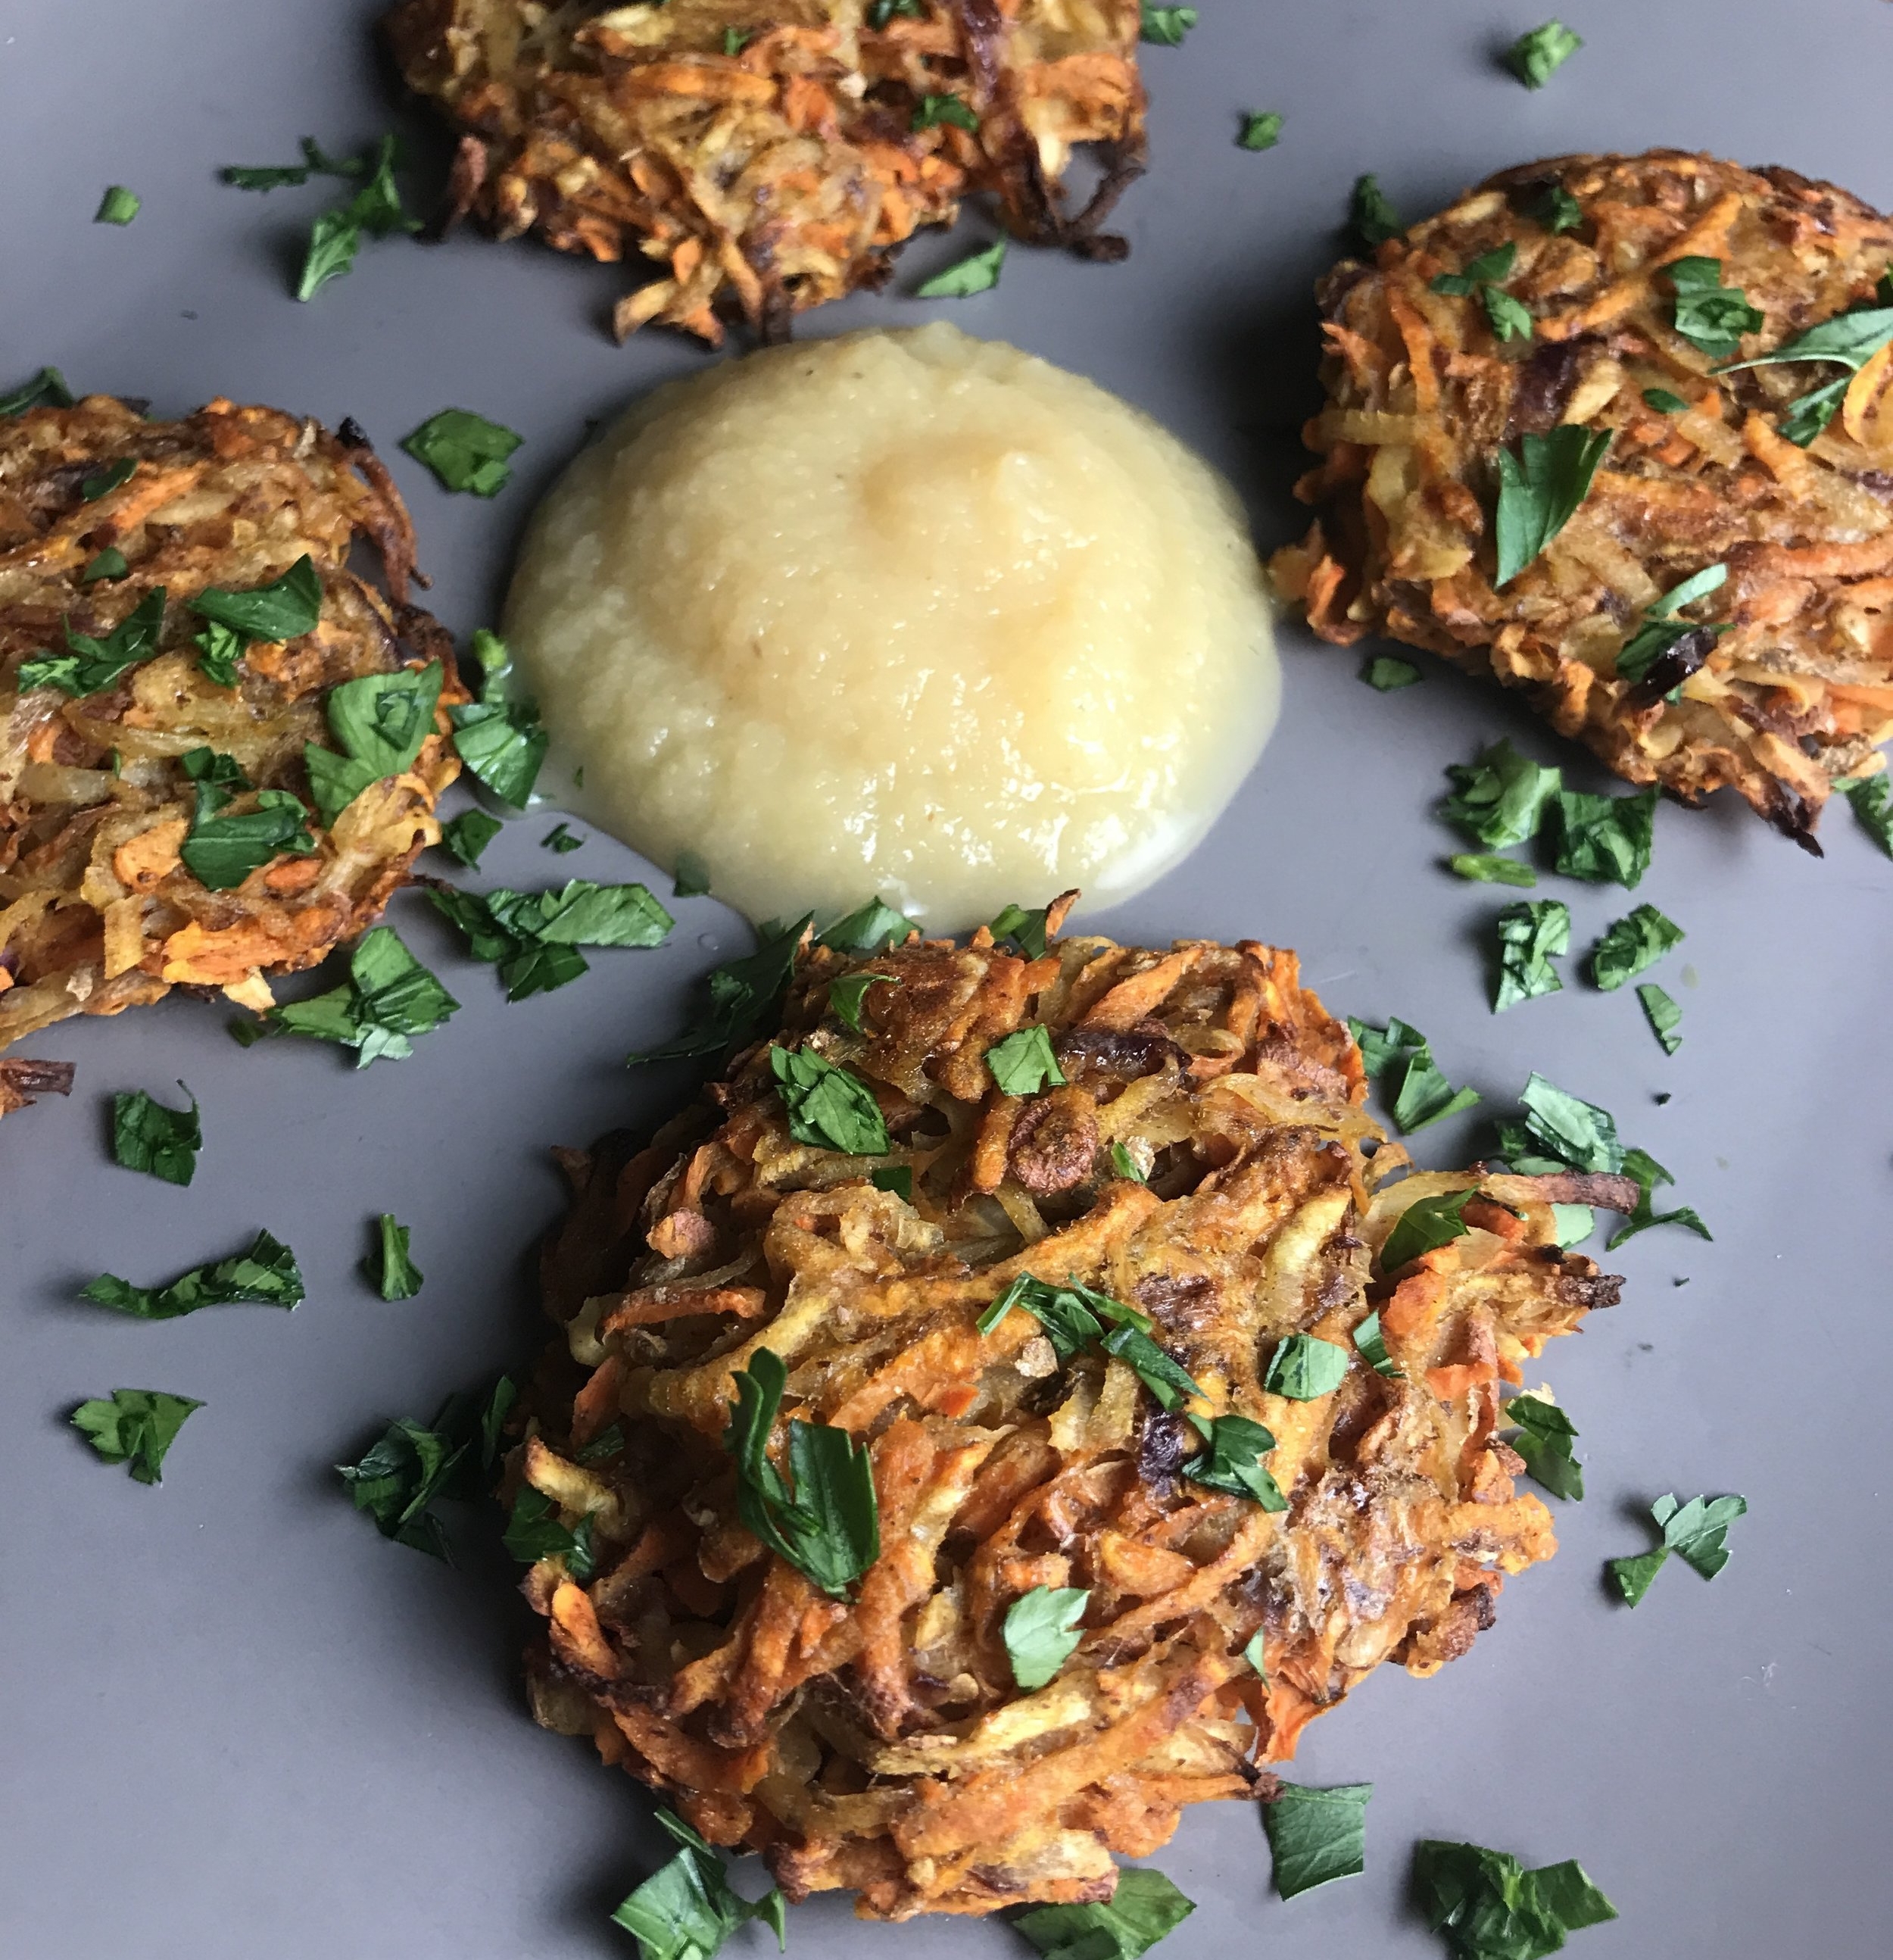
Use your hands to shape the latkes (about 1/4 cup each), spacing them about an inch apart on the prepared baking sheets as each is ready. Once all latkes have been formed, brush the tops with a generous coating of ghee or oil. Bake for 12 minutes, then remove from the oven and flip each latke carefully (I use 2 spatulas for greatest ease). Return latkes to the oven (if you are using two different racks in the oven, be sure to rotate whichever tray was initially above to the bottom), and bake an additional 10–12 minutes, or until latkes are golden brown and crisp on the outside.

Serve latkes immediately, accompanied by applesauce and/or sour cream. Leftover latkes can be re-crisped in a toaster oven.

2 Comments

Pasta con Sesamo e Zucchine

September 11, 2018 Meredith Klein
pasta_sesamo_zucchine.JPG

I stumbled upon this delightful combination of flavors in Parma, Italy, perhaps the unlikeliest of places to find a delicious plant-based dish given that the city is best known for its prosciutto and cheese. The name grabbed my eye on the menu and I was in heaven as soon as I took the first bite. The beauty of this dish is its simplicity, allowing you to really taste each ingredient in its full glory. For the best results, use a really great quality olive oil, choose mature (but not too overgrown) end-of-season zucchini, and do not skip the step of toasting and grinding the sesame seeds.

Prep time: 30m | Serves 4

Ingredients:

2½ Tablespoons sesame seeds
12 ounces fusilli pasta, regular or gluten-free*
3 Tablespoons olive oil, divided
2 medium zucchinis, cut in half lengthwise and sliced into 1/4-inch half-moons
1 Tablespoon tahini
Salt

Preparation:

Heat a small skillet over medium-high heat. When hot, add the sesame seeds and toast for 2–3 minutes or until slightly brown and fragrant, stirring often. If the seeds “jump” out of the skillet, lower the heat slightly. Remove skillet from heat, and when seeds have cooled slightly, transfer them to a mortar and pestle or mini-food processor and grind lightly. Set aside. (This step can be done ahead of time, but I would recommend not doing it too far in advance; same-day is ideal.)

Bring a large pot of salted water to a boil over high heat and place the tahini in a small bowl. While you wait for the pasta water to boil, heat 1 tablespoon of olive oil in a large skillet over medium heat and add the zucchini and a large pinch of salt. Cook the zucchini for about 10 minutes, or until lightly browned, flipping it once the first side has developed color. (If your skillet is not large enough to hold all the zucchini in a single layer, do this step in batches.) Once the zucchini has finished cooking, remove from heat and set aside.

When the pasta water is boiling, cook the pasta until al dente. Just before draining the pasta, transfer 3 tablespoons of pasta cooking water to the bowl with the tahini and whisk together. Once the pasta is drained, add it back into your pot, along with the tahini mixture, the cooked zucchini, the remaining 2 tablespoons of olive oil, most of the ground sesame seeds (save a little for garnish) and ½ teaspoon salt. Stir well and serve immediately, garnished with the reserved sesame seeds.

* Jovial’s brown rice pasta is my choice for a gluten-free option.

Tags pasta, plant-based, vegan, dinner, lunch, italian, zucchini
Comment

Almond & Apricot Tart

July 19, 2018 Meredith Klein
apricot_tart.JPG

This vegan and gluten-free tart recipe can be made using whatever fruit is in season, but if you can find apricots, I highly suggest them. We technically had a "cold" spring in Southern California this past season, which has meant a delayed and slightly longer apricot season than in many years. I was able to find some amazing apricots this last week at the market, even though it's mid-July! They won't be around for long, so if you do desire to try this with the golden gems, make this soon.

What I love most about this tart is that it is not too sweet (the almond marzipan layer is made with a touch of maple syrup, rather than traditional powdered or cane sugar). You can use the crust recipe for savory tarts and omit the coconut sugar. A food processor is essential for this recipe, and make preparation quite quick.

Prep time: 55m | Serves 8–10

Ingredients:

For maple marzipan:
1 cup blanched almonds* (see note below)
¼ cup maple syrup
¼ cup filtered water
1½ teaspoons almond extract

For crust:
2½ cups + 2 Tablespoons almond meal
¼ pound vegan butter (I recommend using Miyoko's Kitchen butter)
2–3 Tablespoons coconut sugar (or sweetener of your choice)
1½ teaspoons ground cardamom (optional)
Pinch of salt

For fruit topping:
¾ pound apricots (or fruit of your choice)

Preparation:

Preheat your oven to 350 degrees.

Place all marzipan ingredients in food processor and blend until an even paste is achieved. You will likely need to stop the machine and scrape down the sides a few times. Once marzipan is complete, transfer it to a small bowl and set aside. Wash and dry the food processor thoroughly.

Place all crust ingredients in the food processor and turn it on. Let the machine run until all ingredients have combined to form one "ball" of dough. Transfer the dough to a 9-inch tart pan and use your fingers to press the dough evenly into the pan to form a crust (I like to use a sheet of parchment to help press the dough so it won't stick to my fingers). Use a fork to prick some small holes into the bottom of the crust to allow steam to release while pre-baking the crust (alternatively, you can use pie weights or dried beans to weigh down the crust – google if you're curious how to do that :)) For easiest handling, place the prepared tart pan on a larger baking tray. Bake the crust for 8-10 minutes until it just starts to turn a slight touch of brown. Some parts may still look a little doughy, and that is fine. Remove the crust from the oven and let it cool slightly. While the crust is cooling, prepare your fruit by slicing it evenly (or, for smaller apricots or fruits like cherries, just cut in half).

When crust is cool, spread the maple marzipan in an even layer in the bottom of the crust using a spatula or your fingers (again, parchment is really helpful here if you use your hands, which I recommend). Then arrange the sliced fruit on top of the marzipan layer in any pattern you like. Bake for 20–25 minutes, until the crust is golden and fruit is has softened slightly. Cool tart completely before removing the outer ring of the tart pan, then you're ready to slice and serve.


To blanch your own almonds:

Bring a small pot of water to a boil. Add almonds, then immediately drain and rinse with cool water. Use your fingers to pop the skins off. This is one of my most favorite meditative cooking practices...and kids LOVE helping with this!

Tags dessert, gluten-free, vegan, tart, almond, apricot
Comment

Spiced Black Lentil Burgers with Sun-Dried Tomato Sauce

June 20, 2018 Meredith Klein
burgersandsauce.jpg

These easy, kid-friendly burgers can be spiced any way you like – feel free to substitute different fresh herbs and spices as you wish. Black lentils are sometimes sold as beluga lentils, or use French green lentils in their place if you cannot find them. Leftover burgers are easily re-heated for a quick meal.

Prep time: 55m | Serves 6–8

Ingredients:

¾ cup black lentils
¾ cup rolled oats
½ onion, roughly chopped
1 egg (for vegan version, use 1 Tablespoon ground flax mixed with 2 Tablespoons water)
1 teaspoon smoked paprika
½ teaspoon ground cumin
1 handful cilantro, chopped
½ teaspoon salt
Neutral cooking oil (for brushing)

For sauce:
½ cup sun-dried tomatoes, soaked in hot water until soft and drained
½ cup canned tomatoes or blanched/peeled fresh tomatoes (when in season)
1 clove garlic, peeled and quartered
A few sprigs of fresh oregano (remove leaves from stem) or a couple leaves of basil
2 teaspoons olive oil
1–2 pinches salt

Preparation:

Pre-heat oven to 375 degrees. Line a large baking sheet with parchment paper or a silicone baking pad.

Place lentils in a medium pot and add water to just cover them. Bring to a boil over high heat, then reduce heat, cover the pot and simmer lentils for 15–17 minutes. They should be cooked through but not mushy. Drain lentils in a fine mesh strainer and rinse with cool water. Let lentils cool slightly before proceeding. 

While lentils cool, prepare the sauce: Place sun-dried and regular tomatoes in a food processor, along with garlic and oregano/basil leaves. Process until sun-dried tomatoes are chopped well. Add in the olive oil and salt and pulse a few times to incorporate. Taste sauce and adjust flavors as you like. Transfer sauce to a bowl for serving.

Place oats in a food processor and process them until they resemble a coarse flour. Transfer the oat flour to a large mixing bowl. Place the onion and lentils in the food processor and use the pulse function a few times until onion is chopped and lentils start to break down (do not overprocess – mixture should not become a paste). Transfer lentils to the same bowl as the oats, and add in the egg, spices, cilantro and salt. Use a wooden spoon or silicon spatula to stir the burger mixture well. Taste and adjust any seasonings as you wish.

Divide the mixture into 6–8 even portions, then use your hands to shape them into uniform patties. Lightly brush both sides of each burger with oil and place on the prepared baking sheet. Bake burgers for 25 minutes, flipping halfway through cooking. Serve immediately, accompanied by the prepared sun-dried tomato sauce.

Tags vegan, vegetarian, dinner, summer, kidfriendly
Comment
← Newer Posts Older Posts →

Stay in Touch!
Contact Meredith